搭建nexus仓库服务器
要求
- 使用docker安装
- 支持docker、maven
- 数据持久化
安装计划
- 数据持久化:将宿主机目录
/data/tools/nexus/nexus-data挂在到容器的/nexus-data目录 nexus管理网页访问端口:8081nexus镜像上传下载端口:8082
下载nexus3镜像
-
搜索nexus镜像
docker search nexus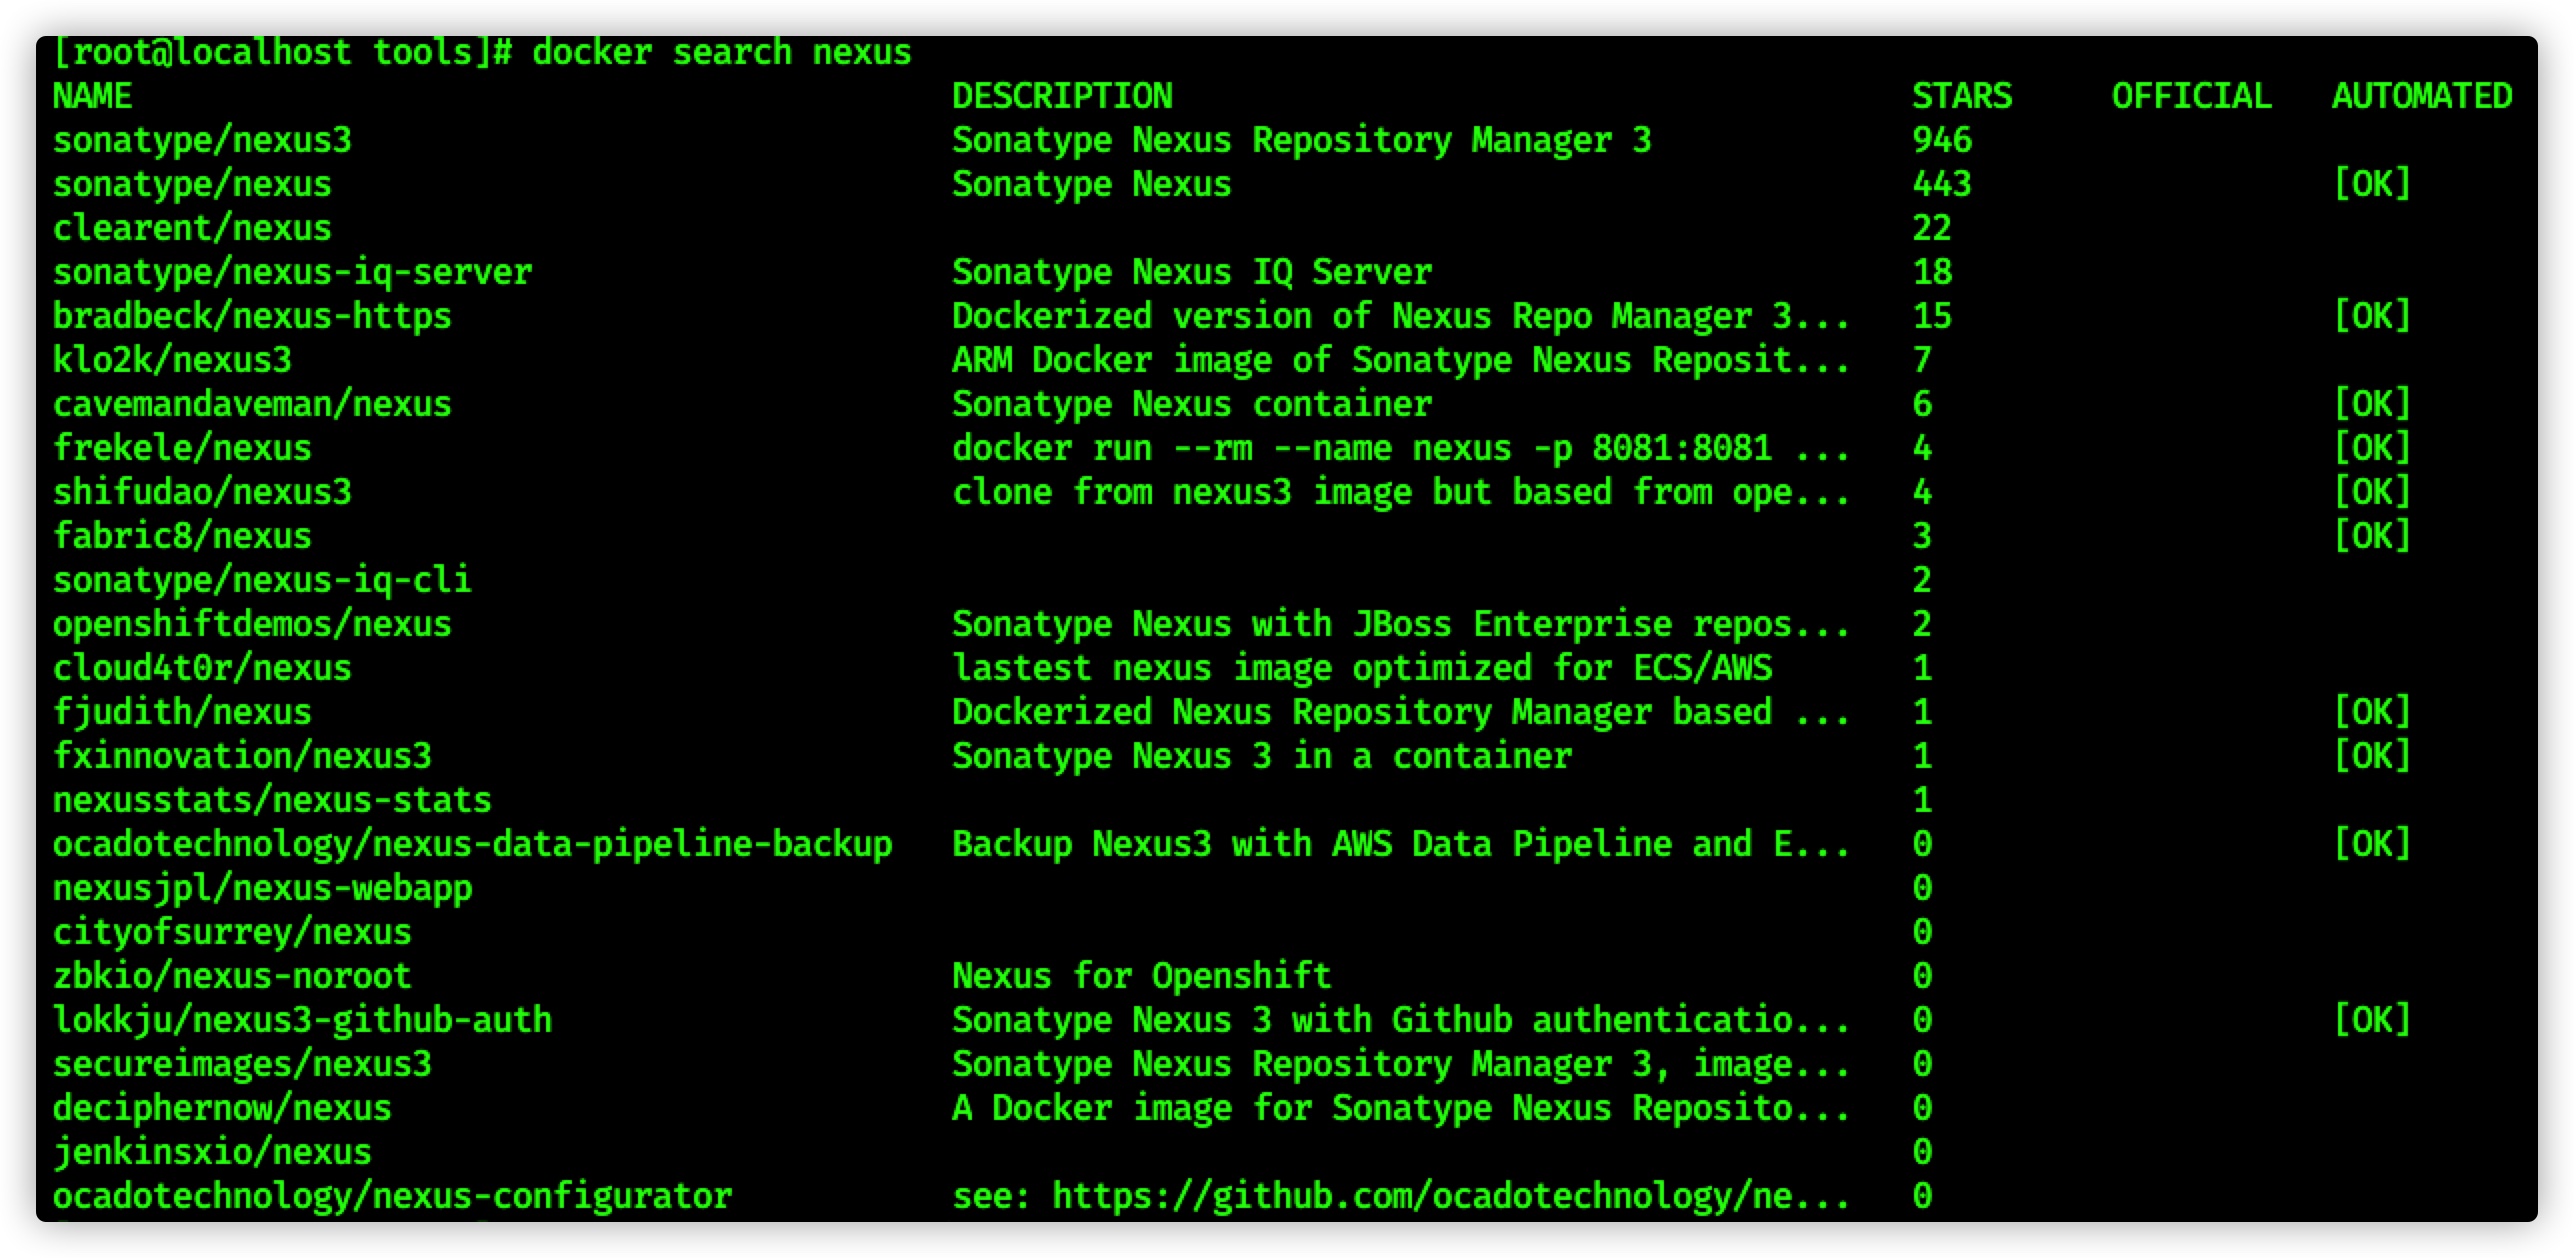
-
下载nexus3镜像
sonatype/nexus3,该镜像使用教程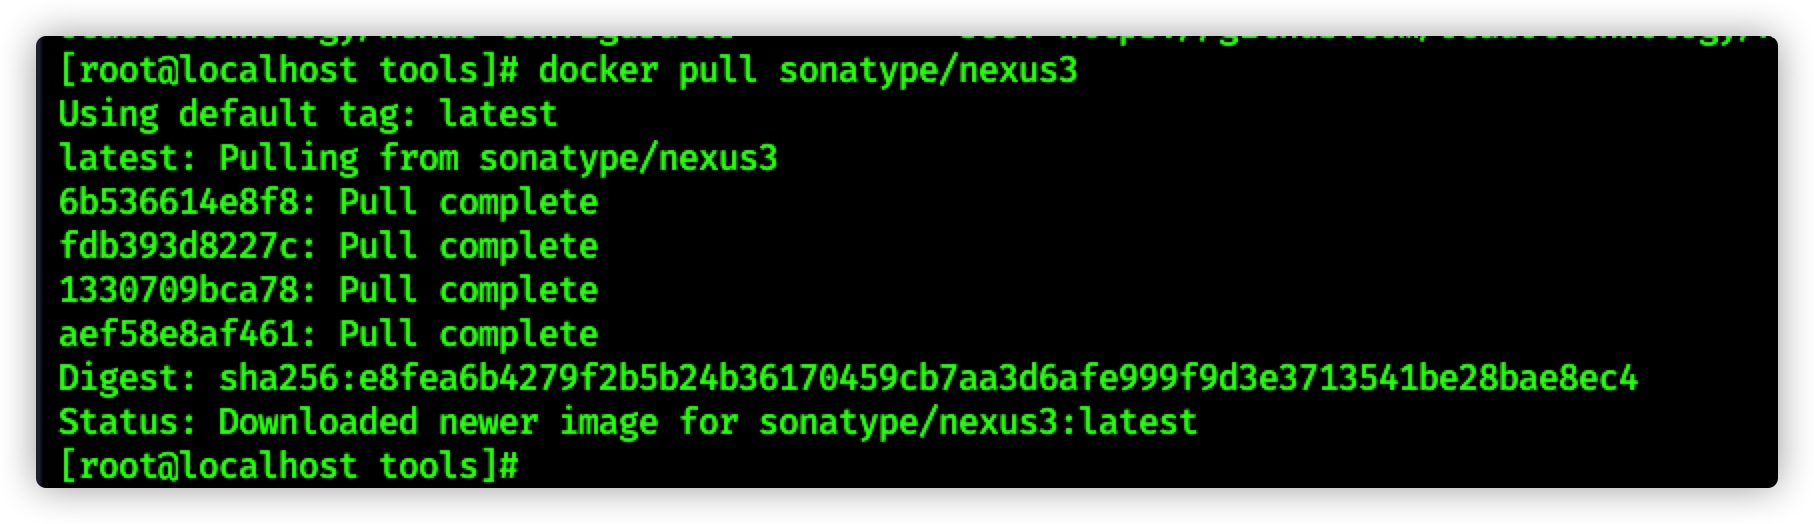
root@localhost:/home$ docker volume create --name nexus-data
运行nexus
-
首次启动,注意
data/tools/nexus/nexus-data目录权限需要修改为200:200,对应容器内部的nexus用户,不然会因权限不足导致启动失败;8081为网页端口,8082为镜像上传下载端口root@localhost:/home/docker/nexus$ sudo chown -R 200:200 /data/tools/docker/nexus/nexus-data/ root@localhost:/home/docker/nexus$ docker run -d -p 8081:8081 -p 8082:8082 --name nexus -v /home/docker/nexus/nexus-data:/nexus-data sonatype/nexus3 526c03402bf6bb3c86105453be55203365b4491c3448c7183227968f12a03e14 -
修改默认端口
- 修改容器内
/nexus-data/etc/nexus.properties文件,application-port=[your port],这里因为和其它应用冲突,所以修改为8081。
- 修改容器内
-
测试工作是否正常
-
命令行检测,正常运行时会输出
pong
-
浏览器打开http://192.168.xx.xx:8081,可正常显示网页
-
-
非首次启动,执行
docer start nexus
Nexus页面配置
参数含义
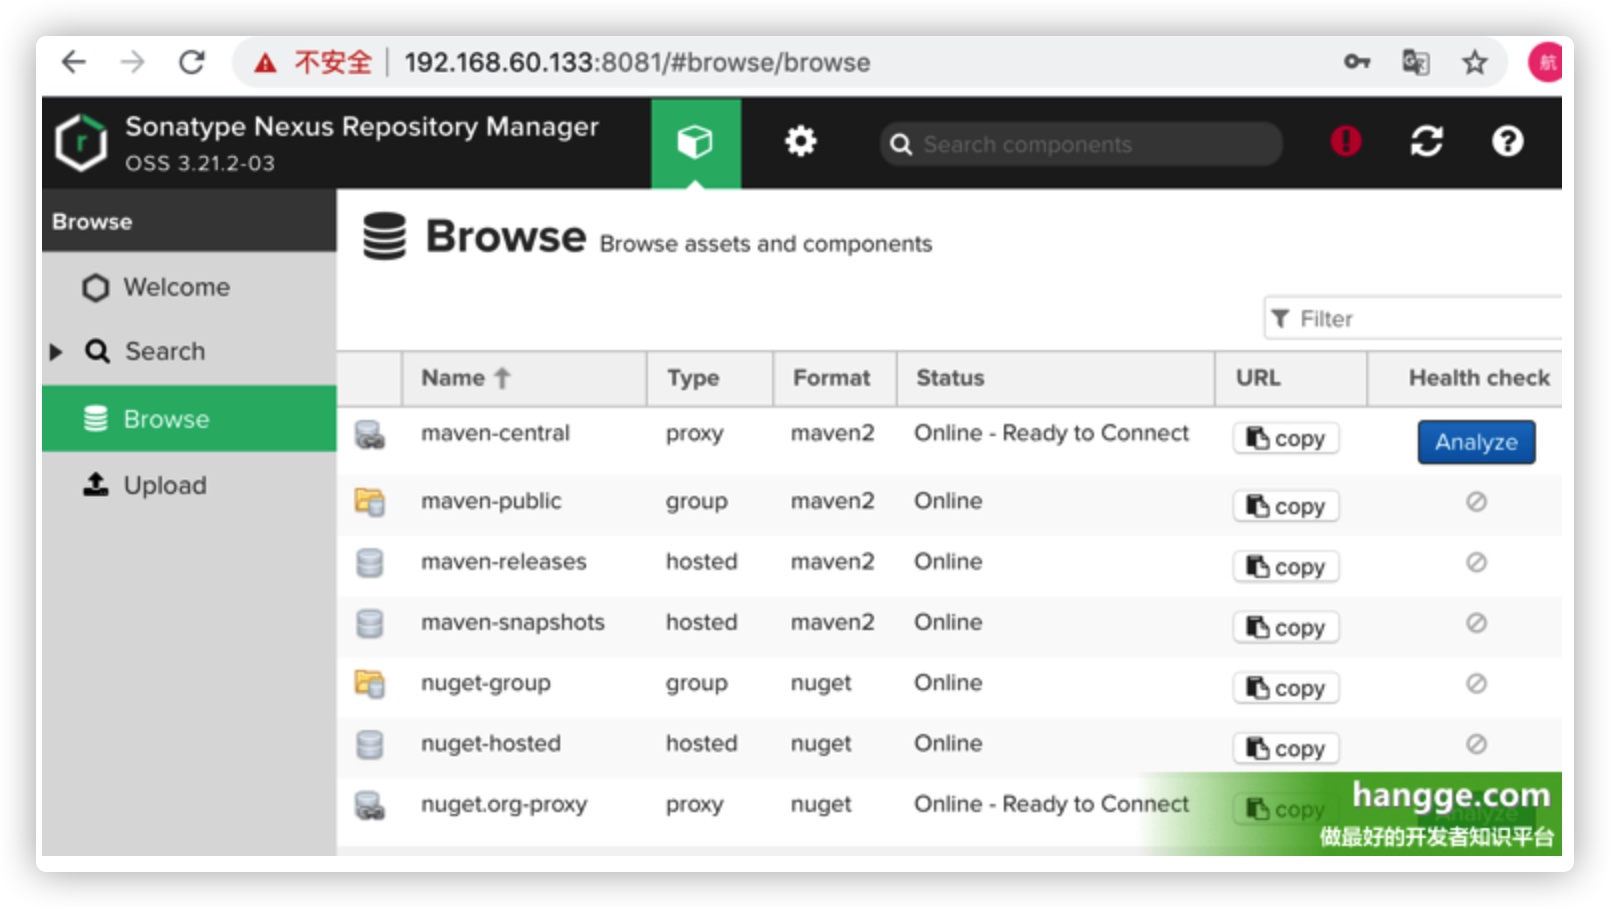
(1)默认仓库说明:
maven-central:maven 中央库,默认从 https://repo1.maven.org/maven2/ 拉取 jar
maven-releases:私库发行版 jar,初次安装请将 Deployment policy 设置为 Allow redeploy
maven-snapshots:私库快照(调试版本)jar
maven-public:仓库分组,把上面三个仓库组合在一起对外提供服务,在本地 maven 基础配置 settings.xml 或项目 pom.xml 中使用

(2)仓库类型说明:
group:这是一个仓库聚合的概念,用户仓库地址选择 Group 的地址,即可访问 Group 中配置的,用于方便开发人员自己设定的仓库。maven-public 就是一个 Group 类型的仓库,内部设置了多个仓库,访问顺序取决于配置顺序,3.x 默认为 Releases、Snapshots、Central,当然你也可以自己设置。
hosted:私有仓库,内部项目的发布仓库,专门用来存储我们自己生成的 jar 文件
snapshots:本地项目的快照仓库
releases: 本地项目发布的正式版本
proxy:代理类型,从远程中央仓库中寻找数据的仓库(可以点击对应的仓库的 Configuration 页签下 Remote Storage 属性的值即被代理的远程仓库的路径),如可配置阿里云 maven 仓库
central:中央仓库
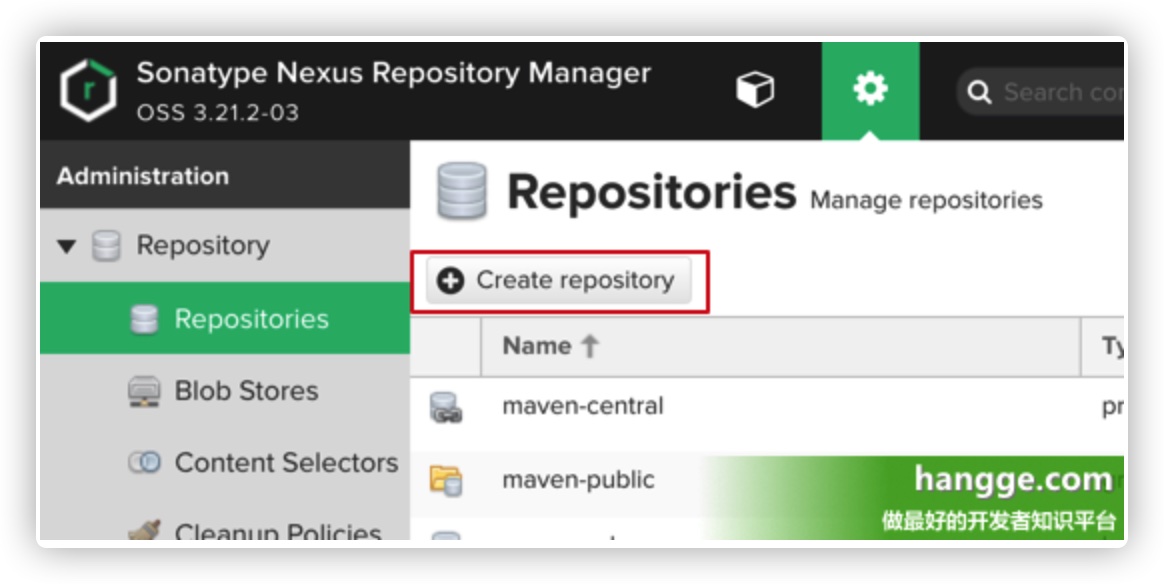
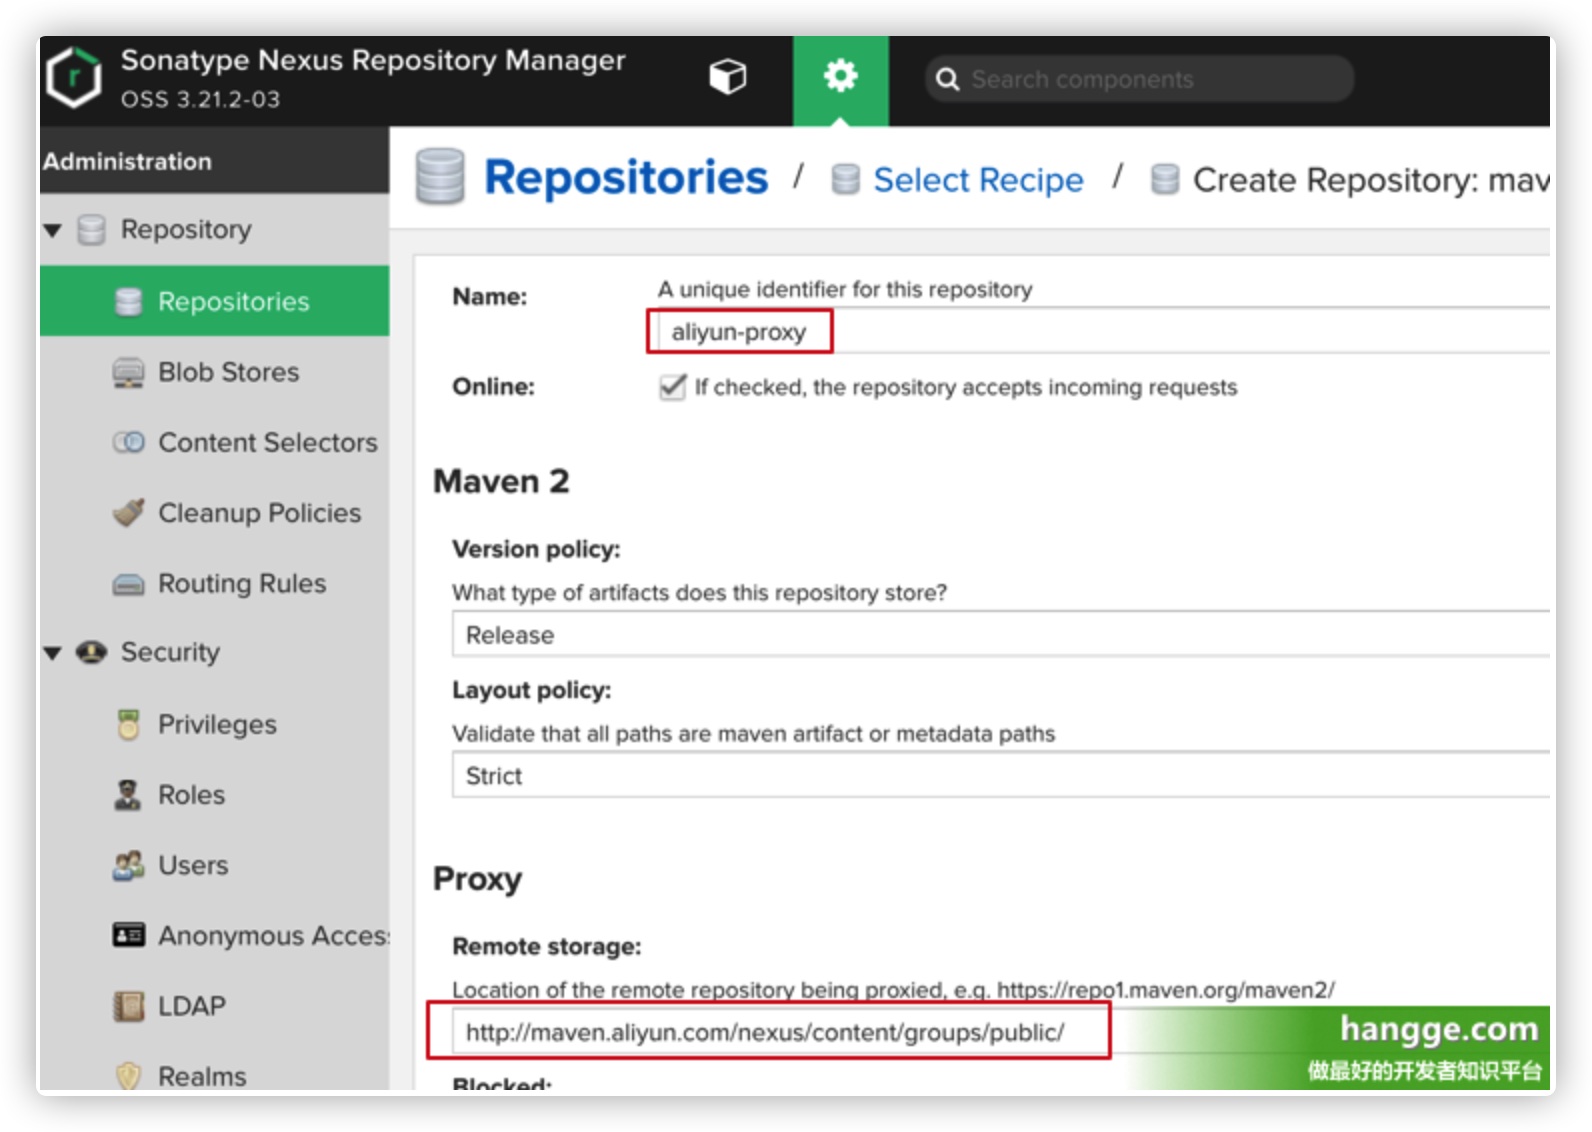
1. 增加一个代理仓库,使用的是阿里云公共仓库。首先点击“Create repository”按钮开始创建一个仓库:
2. 类型选择 maven2(proxy)

3. 配置阿里云地址 http://maven.aliyun.com/nexus/content/groups/public/,name 可以随意填(这里我写 aliyun-proxy),然后点击最下方按钮创建
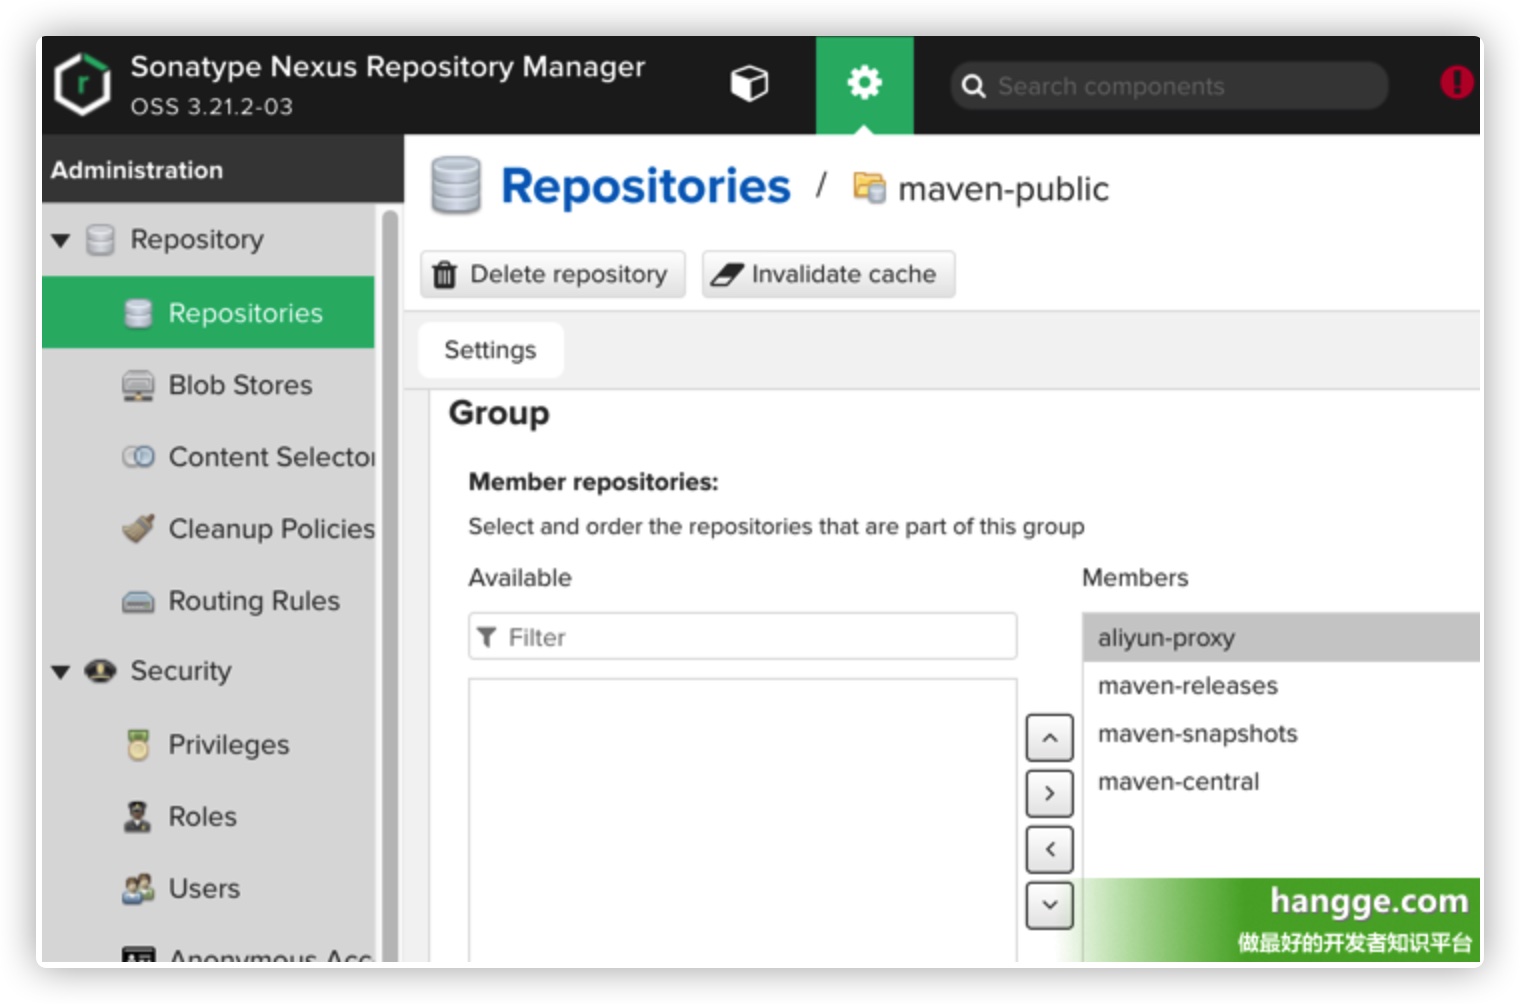
4. 阿里云代理仓库创建完毕后,我们编辑 maven-public,将其添加到放入 group 中,并调整优先级,然后保存
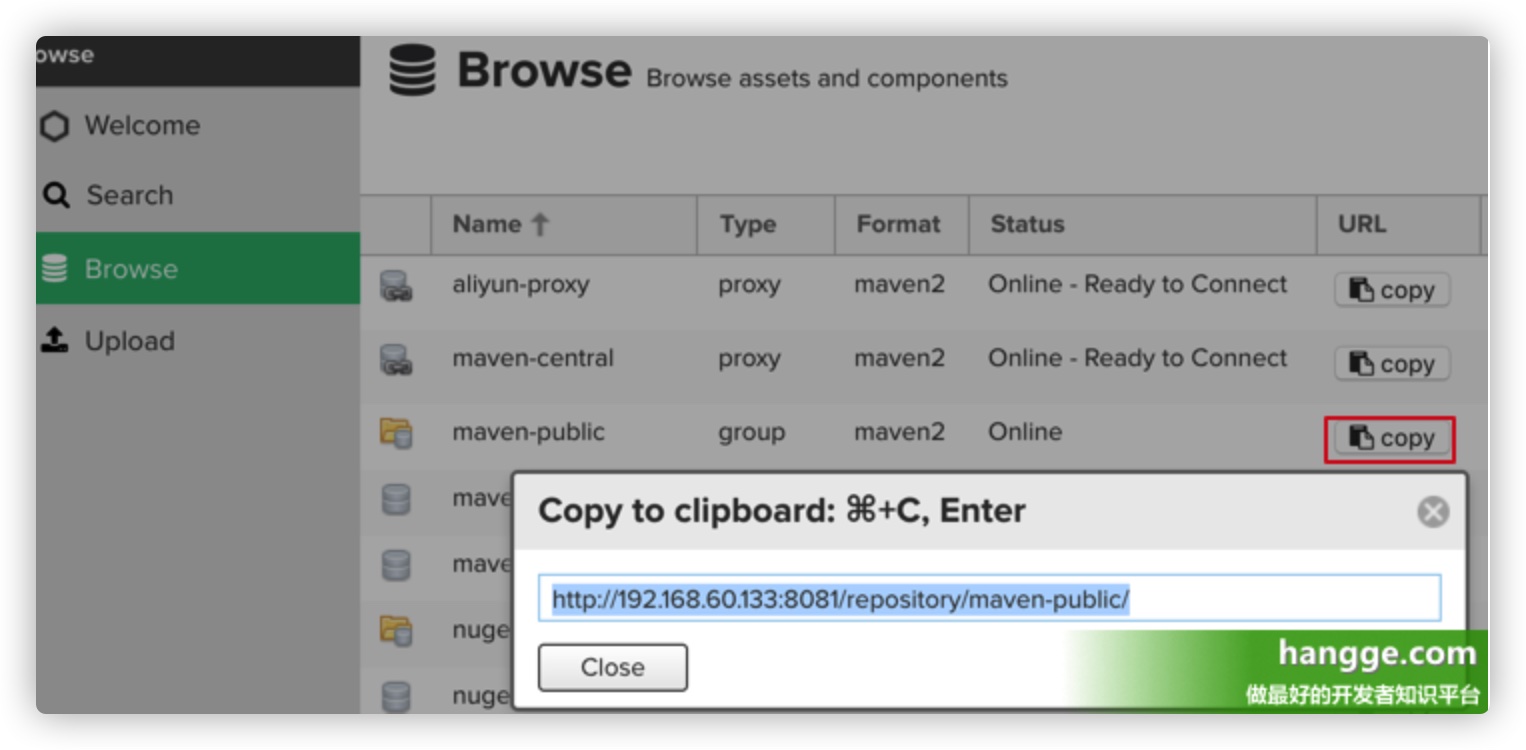
5. copy私服地址
Maven配置使用私服(下载依赖)
1. 基本说明
(1)Maven 配置私服下载有两种方式:
- setting.xml:该文件配置的是全局模式
- pom.xml:该文件的配置的是项目独享模式
注意:若 pom.xml 和 setting.xml 同时配置了,以 pom.xml 为准。
(2)当我们在 maven 使用 maven-public 仓库地址的时候,会按照如下顺序访问:本地仓库 –> 私服 maven-releases –> 私服 maven-snapshots –> 远程阿里云 maven 仓库 –> 远程中央仓库。
2. 通过 setting.xml 文件配置
(1)setting.xml 文件配置样例如下。配置后不需要再配置 pom.xml 文件,即可通过私服下载 jar 依赖包。
<mirrors>
    <mirror>
        <!--该镜像的唯一标识符。id用来区分不同的mirror元素。 -->
        <id>maven-public</id>
        <!--镜像名称 -->
        <name>maven-public</name>
        <!--*指的是访问任何仓库都使用我们的私服-->
        <mirrorOf>*</mirrorOf>
        <!--该镜像的URL。构建系统会优先考虑使用该URL,而非使用默认的服务器URL。 -->
        <url>http://192.168.10.xxx:8081/repository/maven-public/</url>
    </mirror>
</mirrors>
(2)如果我们并没有搭建私服,属于个人开发,那么也可以直接配置使用阿里 云maven 仓库
<mirror>
  <id>nexus-aliyun</id>
  <name>Nexus aliyun</name>
  <mirrorOf>*</mirrorOf>
  <url>http://maven.aliyun.com/nexus/content/groups/public</url>
</mirror>
3. 通过 pom.xml 文件配置
(1)pom.xml 文件配置样例如下。如果我们配置了 pom.xml,则以 pom.xml 为准。
<repositories>
    <repository>
        <id>maven-nexus</id>
        <name>maven-nexus</name>
        <url>http://192.168.10.xxx:8081/repository/maven-public/</url>
        <releases>
            <enabled>true</enabled>
        </releases>
        <snapshots>
            <enabled>true</enabled>
        </snapshots>
    </repository>
</repositories>
(2)如果没有私服,我们同样也可以配置阿里云 maven 仓库:
<repositories>
   <repository>
      <id>maven-aliyun</id>
      <url>http://maven.aliyun.com/nexus/content/groups/public/</url>
      <releases>
         <enabled>true</enabled>
      </releases>
      <snapshots>
         <enabled>true</enabled>
         <updatePolicy>always</updatePolicy>
         <checksumPolicy>fail</checksumPolicy>
      </snapshots>
   </repository>
</repositories>
Maven 配置使用私服(下载插件)
下面是一个使用 pom.xml 配置样例:
<pluginRepositories>
    <pluginRepository>
        <id>maven-nexus</id>
        <name>maven-nexus</name>
        <url>http://10.172.0.201:8081/nexus/repository/maven-public/</url>
        <releases>
            <enabled>true</enabled>
        </releases>
        <snapshots>
            <enabled>true</enabled>
        </snapshots>
    </pluginRepository>
</pluginRepositories>
Maven 配置使用私服(发布依赖)
(1)首先修改 setting.xml 文件,指定 releases 和 snapshots server 的用户名和密码:
<servers>
    <server>
        <id>releases</id>
        <username>admin</username>
        <password>123</password>
    </server>
    <server>
        <id>snapshots</id>
        <username>admin</username>
        <password>123</password>
    </server>
</servers>
(2)接着在项目的 pom.xml 文件中加入 distributionManagement 节点 注意:repository 里的 id 需要和上一步里的 server id 名称保持一致。
<distributionManagement>
    <repository>
        <id>releases</id>
        <name>Releases</name>
        <url>http://192.168.10.xxx:8081/repository/maven-releases/</url>
    </repository>
    <snapshotRepository>
        <id>snapshots</id>
        <name>Snapshot</name>
        <url>http://192.168.10.xxx:8081/repository/maven-snapshots/</url>
    </snapshotRepository>
</distributionManagement>
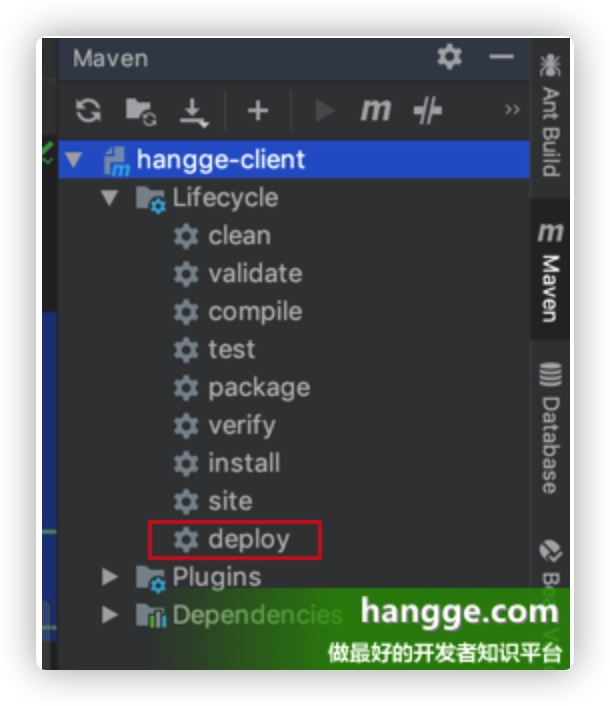
(3)执行 mvn deploy 命令发布:
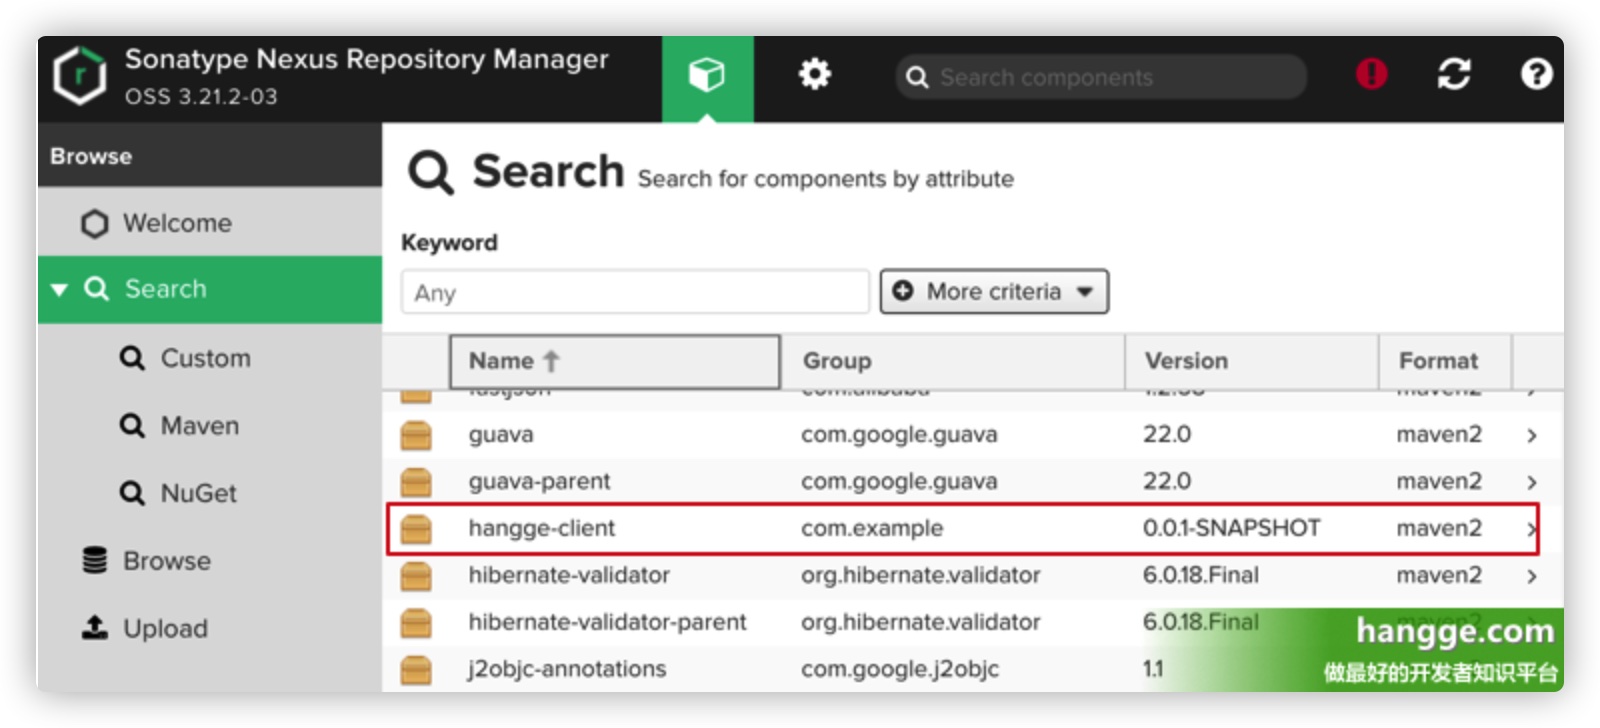
(4)登录 Nexus,查看对应的仓库已经有相关的依赖包了。
发布到的仓库说明:
若项目版本号末尾带有 -SNAPSHOT,则会发布到 snapshots 快照版本仓库
若项目版本号末尾带有 -RELEASES 或什么都不带,则会发布到 releases 正式版本仓库
添加docker hosted仓库(延伸)
- 访问http://192.168.1.56:8092,使用默认账号/密码:
admin/admin123登录 - 创建
docker(hosted)仓库,名称docker-hosted,注意配置http端口,这里配置为8093,与启动参数一致
修改docker启动参数
-
由于我们添加的本地仓库只配置了http服务,而docker默认使用https,因此在docker启动文件
/etc/docker/daemon.json中添加私有仓库地址:"insecure-registries":["http://192.168.1.56:8093"],daemon.json文件内容变为:visual basic { "registry-mirrors": ["https://7uko0u1b.mirror.aliyuncs.com"], "insecure-registries":["http://192.168.1.56:8093"] } -
重启docker服务:
service docker restart
向本地仓库push镜像
-
为待上传的镜像打标签,格式为
docker tag <imageId or imageName> <nexus-hostname>:<repository-port>/<image>:<tag>root@localhost:/home/docker/nexus$ docker images REPOSITORY TAG IMAGE ID CREATED SIZE sonatype/nexus3 latest 9ded7bd31da5 37 hours ago 480MB jenkins/jenkins lts b36e8b881678 37 hours ago 810MB httpd latest b669148bb5a5 6 days ago 177MB stilliard/pure-ftpd latest 193339b4053f 2 weeks ago 439MB ubuntu 16.04 ccc7a11d65b1 4 weeks ago 120MB hello-world latest 1815c82652c0 3 months ago 1.84kB root@localhost:/home/docker/nexus$ docker tag hello-world 192.168.1.56:8093/hello-world:1.0 root@localhost:/home/docker/nexus$ docker images REPOSITORY TAG IMAGE ID CREATED SIZE sonatype/nexus3 latest 9ded7bd31da5 37 hours ago 480MB jenkins/jenkins lts b36e8b881678 37 hours ago 810MB httpd latest b669148bb5a5 6 days ago 177MB stilliard/pure-ftpd latest 193339b4053f 2 weeks ago 439MB ubuntu 16.04 ccc7a11d65b1 4 weeks ago 120MB 192.168.1.56:8082/hello-world 1.0 1815c82652c0 3 months ago 1.84kB hello-world latest 1815c82652c0 3 months ago 1.84kB -
登录仓库,默认账号/密码为:
admin/admin123,不登录就push镜像会提示:no basic auth credentialsroot@localhost:/home/docker/nexus$ docker login 192.168.1.56:8093 Username (admin): admin Password: Login Succeeded -
push镜像
root@localhost:/home/docker/nexus$ docker push 192.168.1.56:8082/hello-world:1.0 The push refers to a repository [192.168.1.56:8093/hello-world] 45761469c965: Layer already exists 1.0: digest: sha256:9fa82f24cbb11b6b80d5c88e0e10c3306707d97ff862a3018f22f9b49cef303a size: 524 -
从http://192.168.1.56:8092上可以看到docker-hosted仓库中已经有了刚刚上传的镜像
从本地仓库搜索镜像
	root@localhost:/home/docker/nexus$ docker search 192.168.1.56:8093/hello
	NAME                                DESCRIPTION   STARS     OFFICIAL   AUTOMATED
	192.168.1.56:8093/hello-world:1.0
从本地仓库pull镜像
		root@localhost:/home/docker/nexus$ docker images
		REPOSITORY            TAG                 IMAGE ID            CREATED             SIZE
		sonatype/nexus3       latest              9ded7bd31da5        37 hours ago        480MB
		jenkins/jenkins       lts                 b36e8b881678        37 hours ago        810MB
		httpd                 latest              b669148bb5a5        6 days ago          177MB
		stilliard/pure-ftpd   latest              193339b4053f        2 weeks ago         439MB
		ubuntu                16.04               ccc7a11d65b1        4 weeks ago         120MB
		hello-world           latest              1815c82652c0        3 months ago        1.84kB
		root@localhost:/home/docker/nexus$ docker pull 192.168.1.56:8093/hello-world:1.0
		1.0: Pulling from hello-world
		Digest: sha256:9fa82f24cbb11b6b80d5c88e0e10c3306707d97ff862a3018f22f9b49cef303a
		Status: Downloaded newer image for 192.168.1.56:8093/hello-world:1.0
		root@localhost:/home/docker/nexus$ docker images
		REPOSITORY                      TAG                 IMAGE ID            CREATED             SIZE
		sonatype/nexus3                 latest              9ded7bd31da5        37 hours ago        480MB
		jenkins/jenkins                 lts                 b36e8b881678        37 hours ago        810MB
		httpd                           latest              b669148bb5a5        6 days ago          177MB
		stilliard/pure-ftpd             latest              193339b4053f        2 weeks ago         439MB
		ubuntu                          16.04               ccc7a11d65b1        4 weeks ago         120MB
		192.168.1.56:8082/hello-world   1.0                 1815c82652c0        3 months ago        1.84kB
		hello-world                     latest              1815c82652c0        3 months ago        1.84kB